งาน 2 Interfacing LCD with CloudX Board
ในการมีความสัมพันธ์ที่ดีระหว่างโลกมนุษย์และโลกจักรกลหน่วยแสดงผลจึงมีความสำคัญ หน้าจอช่วยให้เราทราบว่าเกิดอะไรขึ้นในอุปกรณ์เช่นแรงดัน, อุณหภูมิ, สถานะปัจจุบันของอุปกรณ์และแม้กระทั่งการตรวจจับข้อบกพร่องของอุปกรณ์เป็นต้น LCD มีแอปพลิเคชั่นมากมายในระบบฝังตัวและเป็นที่ต้องการมากกว่าจอแสดงผลเจ็ดส่วน แอลซีดีและตัวเลขที่ใช้บ่อยที่สุดในโครงการแบบฝังเนื่องจากมีอยู่ทั่วไปและใช้งานง่าย


Initializes the LCD based on the provided connections.LCD Cmd
Prototype : LCD_cmd(unsigned char command);Sends the specified command to the LCD display. This function requires the LCD to be initialized with LCD_setting function. It accepts below commands.
| Command | Function |
|---|---|
| Clear | Clears the display |
| returnHome | Returns cursor to home position without changing display data RAM |
| moveCursorRight | Move cursor right by one position without changing display data RAM |
| moveCursorLeft | Move cursor left by one position without changing display data RAM |
| shiftDisplayRight | Shifts display right by one position without changing display data RAM |
| shiftDisplayLeft | Shifts display left by one position without changing display data RAM |
| cursorBlink | Turns ON cursor blinking |
| cursorOff | Turns OFF cursor |
| cursorOn | Turns ON cursor |
LCD Write
Prototype : LCD_write(unsigned char row, unsigned char col, unsigned char chr);
Prints a character in the LCD on the specified position.
LCD WriteCP
Prototype : LCD_writeCP(unsigned char chr);
Prints a character in the LCD on the current cursor position.
LCD WriteText
Prototype : LCD_writeText(unsigned char row, unsigned char col, char *s);
Prints a string on the LCD starting from the specified position.
LCD WriteTextCP
Prototype : LCD_writeTextCP(unsigned char *s);
Prints a string on the LCD starting from the current position.
Custom Character
Prototype : void customCharacter(unsigned char row, unsigned char column, unsigned char addressCGRAM);
This function is used to print custom character on the specified position.
Circuit Diagram
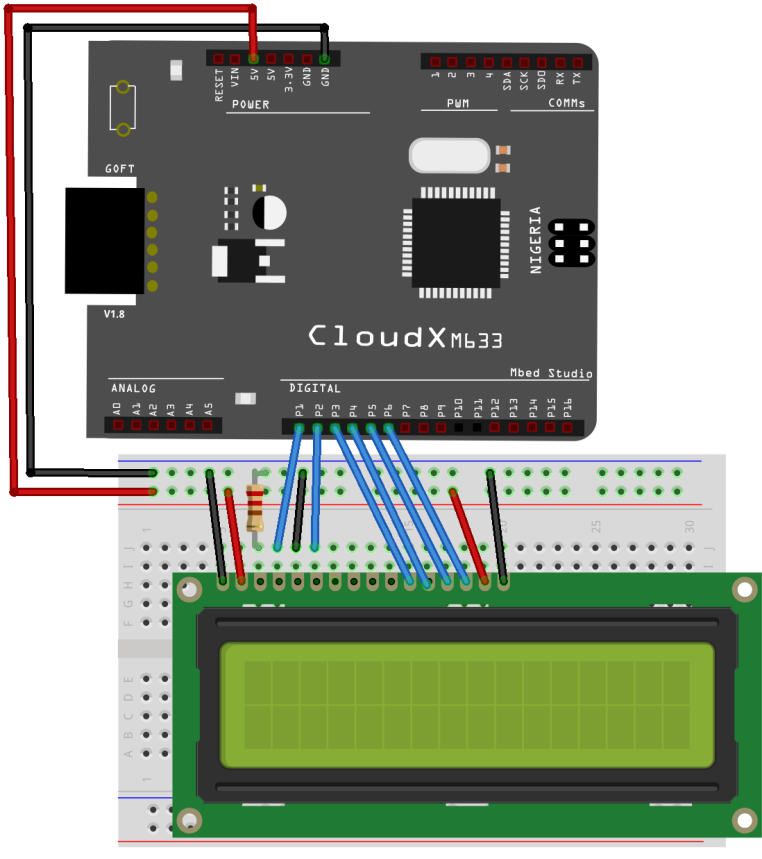
Interfacing LCD with CloudX – Circuit Diagram
Program
#include <CloudX\M633.h
#include <CloudX\Lcd.h>
setup(){
    //setup here
    LCD_setting(1,2,3,4,5,6); //RS, EN, D4, D5, D6, D7
    LCD_cmd(clear); //Clear the display
    loop(){
        //Program here
        LCD_writeText(1,1,"Hello, am CloudX");
        delay(1000);
    }
}
Description

The code above shows how to print a message in the LCD.  Always ensure that M633.h included first before any other library, then we included the LCD library since that’s what we are working with. Under the setup(), we configured the LCD pins based on our hardware design using LCD_setting(1,2,3,4,5,6). I will advise you to go through the CloudX documentation file to learn more about any library before you are using. Then we cleared the screen using LCD_cmd(clear), it will clear any junk data on the display. Then write text on the screen using LCD_writeText(1,1,”Hello, am CloudX”) .https://electrosome.com/interfacing-lcd-cloudx-board/


ความคิดเห็น
แสดงความคิดเห็น