8...มินิโปรเจค หุ่นยนต์เดินตามผนัง Wall Arduino
https://robotsiam.blogspot.com/2017/03/wall-arduino.html
โปรเจค หุ่นยนต์เดินตามผนัง Wall Arduino

โปรเจค หุ่นยนต์เดินตามผนัง Wall Arduino อุปกรณ์ที่ต้องใช้ก็คือ
1. 4WD Smart Robot Car Chassis Kits
2. Arduino UNO R3 - Made in italy
3. Arduino Sensor Shield V5.0
4. เซนเซอร์ Ultrasonic Module HC-SR04 จำนวน 2 ชิ้น
5. Mounting Bracket for HC-SR04 Ultrasonic Module แบบสั้น จำนวน 2 ชิ้น
6. Motor Drive Module L298N
7. สาย Jumper Female to Male ยาว 20cm.
8. สาย Jumper Female to Female ยาว 20cm.
9. รางถ่านแบบ 18650 ใส่ถ่าน 2 ก้อน
10. แบตเตอรี่ลิเธียม 18650 จำนวน 2 ก้อน
11. เสารองแผ่นพีซีบีโลหะแบบเหลี่ยม 6 mm
12. สกรูหัวกลมน็อตตัวเมีย ขนาด 3มม ยาว12มม.
13. เพาเวอร์สวิตซ์สำหรับเปิดปิด (ON / OFF Rocker Switch)
14. สายไฟแดงดำ ขนาด 22AWG
เริ่มด้วย ต่อสายไฟสำหรับมอเตอร์ ทั้ง 4 ตัว ที่ 4WD smart car chassis ให้มา โดยให้ ขั้วลบ สายไฟสีดำ อยู่ด้านบน เหมือนกันทั้ง 4 ตัว

ประกอบเข้ากับ โครง ชิ้นที่ 1 ของ 4WD smart car chassis ดังรูป


ประกอบ น็อต 6 จุด สำหรับ วาง โครง ชิ้นที่ 2

ประกอบ บอร์ด Motor Drive Module L298N ลงที่ โครง ชิ้นที่ 1

เชื่อมสายไฟ ของ มอเตอร์ ด้านบน สายสีดำ ขั้ว - ของมอเตอร์ ตัวที่1 เข้า กับมอเตอร์ ตัวที่2 และ สายสีแดง ขั้ว+ ของมอเตอร์ ตัวที่1 เข้า กับมอเตอร์ ตัวที่2 และ เช่นกันทำที่ มอเตอร์ คู่ด้านล่างด้วย เพื่อให้เหมือนมีมอเตอร์ จาก 4 ตัว เหลือ 2 ตัว
จากนั้น ประกอบสายไฟ ของมอเตอร์ ทั้ง 2 ตัว เข้ากับ บอร์ด L298N ดังรูป

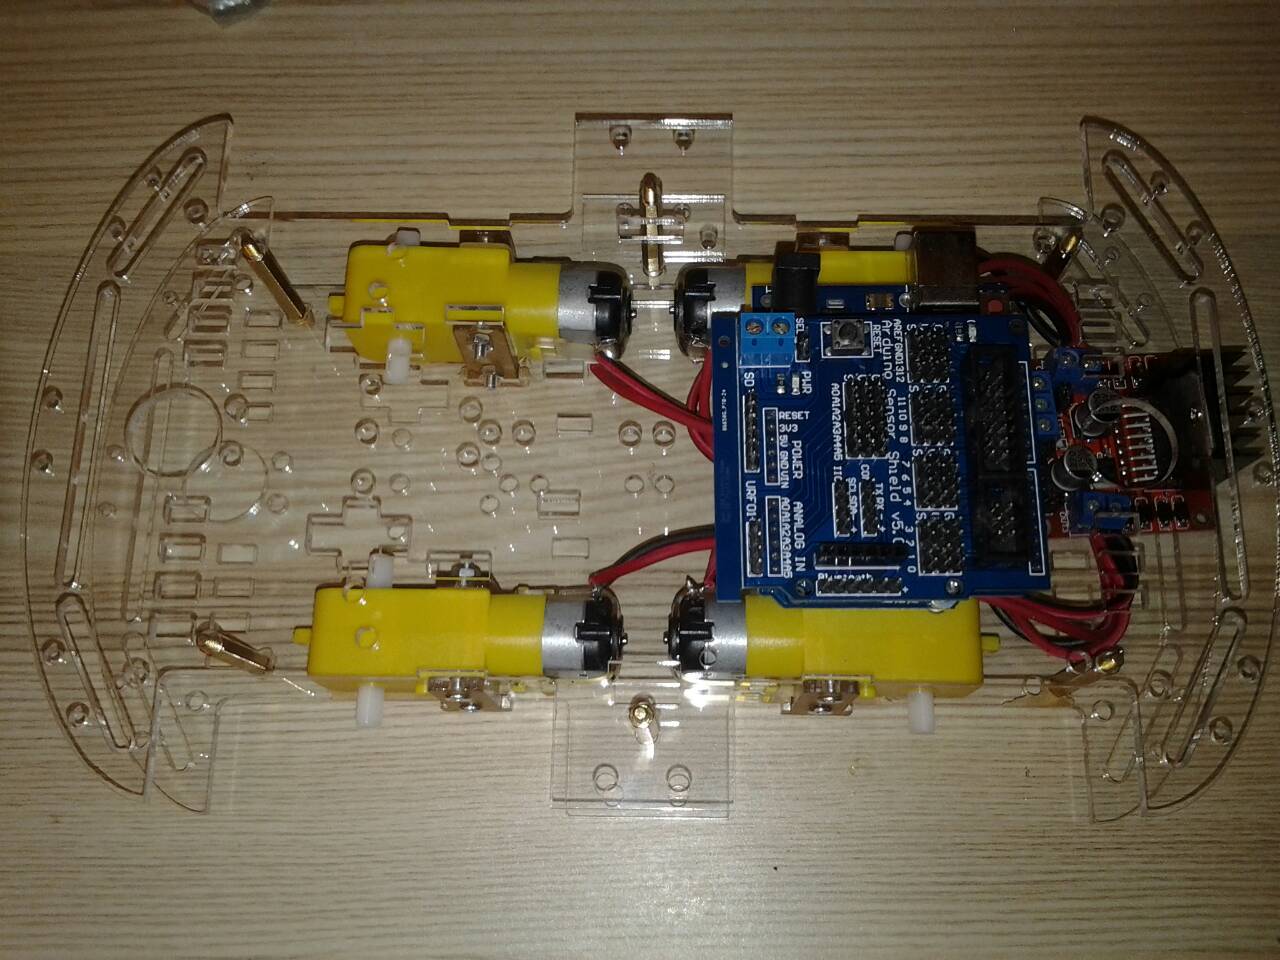
ประกอบ โครงชิ้นที่ 2 เข้าที่ ด้านบนของ โครงชิ้นที่ 1 และ ประกอบ บอร์ด Arduino UNO R3 ลงที่โครงชิ้นที่ 2 ซึ่งอยู่ชั้นบน

ประกอบ บอร์ด Arduino Sensor Shield V5.0 ลงที่ บอร์ด Arduino UNO R3
ประกอบ รางถ่านแบบ 18650 และ เชื่อมต่อ วงจรตามรูป

หมายเหตุ : ถ้ามี Jumper อยู่ที่ขา ENA และ ENB ของ บอร์ด L298N ให้ถอดออก


การเชื่อมต่อระหว่าง บอร์ด Arduino Sensor Shield V5.0 กับ บอร์ด L298N

.*** VCC ของ Arduino Sensor Shield V5.0 คือ V ***
หลังจากนั้นให้ทดสอบเบื้องต้น ว่าการหมุนของล้อถูกต้องหรือไม่ โดย
เปิดโปรแกรม Arduino (IDE) และ Upload โค้ดนี้ ไปยัง บอร์ด Arduino UNO R3
// Motor A pins (enableA = enable motor, pinA1 = forward, pinA2 = backward)
int enableA = 3;
int pinA1 = 6;
int pinA2 = 7;
//Motor B pins (enabledB = enable motor, pinB2 = forward, pinB2 = backward)
int enableB = 5;
int pinB1 = 8;
int pinB2 = 9;
//This lets you run the loop a single time for testing
boolean run = true;
void setup() {
pinMode(enableA, OUTPUT);
pinMode(pinA1, OUTPUT);
pinMode(pinA2, OUTPUT);
pinMode(enableB, OUTPUT);
pinMode(pinB1, OUTPUT);
pinMode(pinB2, OUTPUT);
}
void loop() {
if (run) {
delay(2000);
enableMotors();
//Go forward
forward(200);
//Go backward
backward(200);
//Turn left
turnLeft(400);
coast(200);
//Turn right
turnRight(400);
coast(200);
//This stops the loop
run = false;
}
}
//Define high-level H-bridge commands
void enableMotors()
{
motorAOn();
motorBOn();
}
void disableMotors()
{
motorAOff();
motorBOff();
}
void forward(int time)
{
motorAForward();
motorBForward();
delay(time);
}
void backward(int time)
{
motorABackward();
motorBBackward();
delay(time);
}
void turnLeft(int time)
{
motorABackward();
motorBForward();
delay(time);
}
void turnRight(int time)
{
motorAForward();
motorBBackward();
delay(time);
}
void coast(int time)
{
motorACoast();
motorBCoast();
delay(time);
}
void brake(int time)
{
motorABrake();
motorBBrake();
delay(time);
}
//Define low-level H-bridge commands
//enable motors
void motorAOn()
{
digitalWrite(enableA, HIGH);
}
void motorBOn()
{
digitalWrite(enableB, HIGH);
}
//disable motors
void motorAOff()
{
digitalWrite(enableB, LOW);
}
void motorBOff()
{
digitalWrite(enableA, LOW);
}
//motor A controls
void motorAForward()
{
digitalWrite(pinA1, HIGH);
digitalWrite(pinA2, LOW);
}
void motorABackward()
{
digitalWrite(pinA1, LOW);
digitalWrite(pinA2, HIGH);
}
//motor B controls
void motorBForward()
{
digitalWrite(pinB1, HIGH);
digitalWrite(pinB2, LOW);
}
void motorBBackward()
{
digitalWrite(pinB1, LOW);
digitalWrite(pinB2, HIGH);
}
//coasting and braking
void motorACoast()
{
digitalWrite(pinA1, LOW);
digitalWrite(pinA2, LOW);
}
void motorABrake()
{
digitalWrite(pinA1, HIGH);
digitalWrite(pinA2, HIGH);
}
void motorBCoast()
{
digitalWrite(pinB1, LOW);
digitalWrite(pinB2, LOW);
}
void motorBBrake()
{
digitalWrite(pinB1, HIGH);
digitalWrite(pinB2, HIGH);
}
ถอดสาย USB ระหว่าง Arduino กับ คอมพิวเตอร์ออก และ หาอุปกรณ์ที่สามารถยกตัวรถ 4WD smart car chassis ขึ้นแล้ว ล้อไม่แตะพื้น เพือทดสอบการหมุนของล้อว่าถูกต้องหรือไม่

ใส่ แบตเตอรี่ลิเธียม 18650 จำนวน 2 ก้อน ไปที่ รางถ่าน และ ตรวจสอบขั้วของแบตเตอรี่ ใส่ถุกต้องหรือไม่

โปรแกรมนี้จะทำงานเพียง 1 ครั้ง ถ้าต้องการทดลองใหม่ให้ถอด แบตเตอรี่ออก (หรือ ปิดเปิด สวิทช์ไฟใหม่) แล้วใส่เข้าไปใหม่ เมื่อล้อหมุน ตรวจสอบการหมุน ขอล้อต่างๆถูกต้องหรือไม่ ถ้าต่อวงจรถูกต้อง ล้อ ทั้งสองข้างจะหมุนไปข้างหน้า 1ครั้ง กลับหลัง 1 ครั้ง และ เดินหน้าอีกหนึ่งครั้งแล้วจึงหยุด ถ้าไม่ถูกต้องให้แก้ไข เช่นการต่อขั้วของมอเตอร์ผิด เป็นต้น
ถ้าทุกอย่างถูกต้อง ทดลอง ยกลงวางที่พื้นแล้วทดสอบ อีกครั้ง ถอด แบตเตอรี่ออก (หรือ ปิดเปิด สวิทช์ไฟใหม่) แล้วใส่เข้าไปใหม่ ถ้าทุกอย่างถูกต้อง รถจะเคลื่อนไปข้างหน้า-ถอยหลัง แล้ว เลี้ยวซ้าย แล้ว จึงเลี้ยวขวากลับสู่ตำแหน่งเดิม
เชื่อมต่อ เซ็นเซอร์ HC-SR04 ตัวที่ 1 กับ Sensor Shield V5.0 ดังรูป

ประกอบ HC-SR04 ตัวที่1 เข้ากับ Mounting Bracket for HC-SR04 Ultrasonic Module แบบสั้น และ ประกอบ Bracket เข้ากลับ โครงรถ ตามรูป

ตัวอย่างการใช้งาน ตามลิงค์ด้านล่าง
https://robotsiam.blogspot.com/2016/09/ultrasonic-module-hc-sr04.html
และทดสอบการเชื่อมต่อ HC-SR04 ตัวที่ 1 ว่าถูกต้องหรือไม่ อุปกรณ์ใช้งานได้หรือไม่ โดย Upload โค้ดนี้ ไปยัง บอร์ด Arduino UNO R3
#include <NewPing.h>

NewPing.h คือไลบรารี่ NewPing เป็น ไลบรารี่ ฟังก์ชัน ที่มีผู้พัฒนาเตรียมพร้อมไว้ให้เราแล้ว โดยให้ไปดาวน์โหลด ไลบรารี่ NewPing ได้ที่
ตัวอย่างการใช้งาน ตามลิงค์ด้านล่าง
https://robotsiam.blogspot.com/2016/09/ultrasonic-module-hc-sr04.html
และทดสอบการเชื่อมต่อ HC-SR04 ตัวที่ 1 ว่าถูกต้องหรือไม่ อุปกรณ์ใช้งานได้หรือไม่ โดย Upload โค้ดนี้ ไปยัง บอร์ด Arduino UNO R3
#include <NewPing.h>
NewPing sonar(10, 11); //ให้ Pin 10 และ 11 เป็นขาของเซนเซอร์ เรียกใช้งานคำสั่งจาก Library
long cm; //ประกาศตัวแปร cm ให้เป็นข้อมูลชนิดจำนวนเต็ม -2147483648 ถึง 2147483649
void setup()
{
{
Serial.begin(9600); //ตั้งค่าความเร็วในการรับ-ส่งข้อมูล ค่ามาตรฐาน คือ 9600
}
void loop()
{
{
delay(50);
cm = sonar.ping_cm(); //รับค่าจาก Library NewPing หน่วยเป็น เซ็นติเมตร
Serial.print(cm); //พิมพ์ค่าที่ได้ออกมา
Serial.print(" cm."); //พิมพ์ cm ต่อท้าย ค่าที่ได้รับ
Serial.print("\n");
}
เมื่อ Upload เสร็จ ให้เปิด Serial Monitor ขึ้นมา โดยไปที่ Tools -> Serial Monitor

เมื่อ Upload เสร็จ ให้เปิด Serial Monitor ขึ้นมา โดยไปที่ Tools -> Serial Monitor
ทดลอง เอามือ หรือ วัตถุอื่นๆ เครื่อนไหว ขึ้นลง หน้าจุดรับสัญญาณ อัลตร้าโซนิค HC-SR04

ที่ Serial Monitor จะแสดงค่า ระยะความห่างของมือเรากับ HC-SR04 หน่วยเป็น เซ็นติเมตร (cm) ตามที่เราเครื่อนไหว แสดงว่า โมดูลอัลตร้าโซนิค HC-SR04 ของเรา นั้นพร้อมใช้งานแล้วครับ
เชื่อมต่อ เซ็นเซอร์ HC-SR04 ตัวที่ 2 กับ Sensor Shield V5.0
Sensor Shield V5.0 <--> HC-SR04 ตัวที่2
V <--> VCC
G <--> GND
D12 <--> Trig
D13 <--> Echo
ประกอบ HC-SR04 ตัวที่2 เข้ากับ Mounting Bracket for HC-SR04 Ultrasonic Module แบบสั้น และ ประกอบ Bracket เข้ากลับ โครงรถ ตามรูป


และทดสอบการเชื่อมต่อ HC-SR04 ตัวที่ 2 ว่าถูกต้องหรือไม่ อุปกรณ์ใช้งานได้หรือไม่ โดย Upload โค้ดนี้ ไปยัง บอร์ด Arduino UNO R3
#include <NewPing.h>
NewPing sonar(12, 13); //ให้ Pin 12 และ 13 เป็นขาของเซนเซอร์ เรียกใช้งานคำสั่งจาก Library
long cm; //ประกาศตัวแปร cm ให้เป็นข้อมูลชนิดจำนวนเต็ม -2147483648 ถึง 2147483649
void setup()
{
{
Serial.begin(9600); //ตั้งค่าความเร็วในการรับ-ส่งข้อมูล ค่ามาตรฐาน คือ 9600
}
void loop()
{
{
delay(50);
cm = sonar.ping_cm(); //รับค่าจาก Library NewPing หน่วยเป็น เซ็นติเมตร
Serial.print(cm); //พิมพ์ค่าที่ได้ออกมา
Serial.print(" cm."); //พิมพ์ cm ต่อท้าย ค่าที่ได้รับ
Serial.print("\n");
}
และ ทดสอบการทำงาน โดยทำตามขั้นตอนเหมือน HC-SR04 ตัวที่ 1
แนวคิด การทำงาน ของ หุ่นยนต์เดินตามผนัง Wall Arduino คือ หุ่นยนต์จะเดินห่างผนังไม่เกิน 15 เซ็นติเมตร และ เมื่อเจอผนังด้านหน้า ให้เลี้ยวซ้าย
เขียนตัวอย่างโค้ดได้ดังนี้
if ((sensor_1 < 10) && (sensor_2 > 15)) {
turnLeft(100);
forward(1);
}
else if ((sensor_1 > 15) && (sensor_2 > 15)) {
turnRight(100);
forward(1);
}
else if ((sensor_1 > 10) && (sensor_1 < 15) && (sensor_2 > 15)) {
forward(1);
}
else if ((sensor_1 > 10) && (sensor_1 < 15) && (sensor_2 < 15)) {
turnLeft(600);
forward(1);
}
else {
forward(1);
}
}
1. เมื่อเซ็นเซอร์ HC-SR04 ตัวที่ 1 (ด้านข้าง) ตรวจจับ ค่าความห่างจากผนัง น้อยกว่า 10 เซ็นติเมตร และ เซ็นเซอร์ HC-SR04 ตัวที่ 2 (ด้านหน้า) อยู่ห่างจากผนัง น้อยกว่า 15 เซ็นติเมตร ให้หุ่นยนต์เลี้ยวไปทางซ้าย แล้วจึงเดินหน้า

2. เมื่อเซ็นเซอร์ HC-SR04 ตัวที่ 1 (ด้านข้าง) ตรวจจับ ค่าความห่างจากผนัง มากกว่า 15 เซ็นติเมตร และ เซ็นเซอร์ HC-SR04 ตัวที่ 2 (ด้านหน้า) อยู่ห่างจากผนัง น้อยกว่า 15 เซ็นติเมตร ให้หุ่นยนต์เลี้ยวไปทางขวา แล้วจึงเดินหน้า

3. เมื่อเซ็นเซอร์ HC-SR04 ตัวที่ 1 (ด้านข้าง) ตรวจจับ ค่าความห่างจากผนัง มากกว่า 10 เซ็นติเมตร และ น้อยกว่า 15 เซ็นติเมตร และ เซ็นเซอร์ HC-SR04 ตัวที่ 2 (ด้านหน้า) อยู่ห่างจากผนัง มากกว่า 15 เซ็นติเมตร ให้หุ่นยนต์เดินหน้า

4. เมื่อเซ็นเซอร์ HC-SR04 ตัวที่ 1 (ด้านข้าง) ตรวจจับ ค่าความห่างจากผนัง มากกว่า 10 เซ็นติเมตร และ น้อยกว่า 15 เซ็นติเมตร และ เซ็นเซอร์ HC-SR04 ตัวที่ 2 (ด้านหน้า) อยู่ห่างจากผนัง น้อยกว่า 15 เซ็นติเมตร ให้หุ่นยนต์เลี้ยวซ้าย 90 องศา แล้วจึงเดินหน้า

5. อื่นๆ ให้หุ่นยนต์เดินหน้า

6.ภาพรวมการทำงาน

จากนั้น Upload โค้ดโปรเจค หุ่นยนต์เดินตามผนัง Wall Arduino ไปยัง บอร์ด Arduino UNO R3
#include <NewPing.h>
//Tell the Arduino where the sensor is hooked up
NewPing sonar1(10, 11);
NewPing sonar2(12, 13);
int enableA = 3;
int pinA1 = 6;
int pinA2 = 7;
int enableB = 5;
int pinB1 = 8;
int pinB2 = 9;
long sensor_1;
long sensor_2;
void setup() {
pinMode(enableA, OUTPUT);
pinMode(pinA1, OUTPUT);
pinMode(pinA2, OUTPUT);
pinMode(enableB, OUTPUT);
pinMode(pinB1, OUTPUT);
pinMode(pinB2, OUTPUT);
delay(2000);
}
void loop() {
//Run the motors at slightly less than full power
analogWrite(enableA, 200); // ปรับค่าความเร็วของหุ่นยนต์ 0-255
analogWrite(enableB, 200); // ปรับค่าความเร็วของหุ่นยนต์ 0-255
//Ping the sensor and determine the distance in inches
sensor_1 = sonar1.ping_cm(); // ค่าเซ็นเซอร์ตัวที่ 1 ความห่างหน่วยเป็นเซ็นติเมตร
sensor_2 = sonar2.ping_cm(); // ค่าเซ็นเซอร์ตัวที่ 2 ความห่างหน่วยเป็นเซ็นติเมตร
//If the robot detects an obstacle less than four inches away, it will back up, then turn left; if no obstacle is detected, it will go forward
if ((sensor_1 < 10) && (sensor_2 > 15)) {
turnLeft(100);
forward(1);
}
else if ((sensor_1 > 15) && (sensor_2 > 15)) {
turnRight(100);
forward(1);
}
else if ((sensor_1 > 10) && (sensor_1 < 15) && (sensor_2 > 15)) {
forward(1);
}
else if ((sensor_1 > 10) && (sensor_1 < 15) && (sensor_2 < 15)) {
turnLeft(600);
forward(1);
}
else {
forward(1);
}
}
//Define high-level H-bridge commands
void enableMotors()
{
motorAOn();
motorBOn();
}
void disableMotors()
{
motorAOff();
motorBOff();
}
void forward(int time)
{
motorAForward();
motorBForward();
delay(time);
}
void backward(int time)
{
motorABackward();
motorBBackward();
delay(time);
}
void turnLeft(int time)
{
motorABackward();
motorBForward();
delay(time);
}
void turnRight(int time)
{
motorAForward();
motorBBackward();
delay(time);
}
void coast(int time)
{
motorACoast();
motorBCoast();
delay(time);
}
void brake(int time)
{
motorABrake();
motorBBrake();
delay(time);
}
//Define low-level H-bridge commands
//enable motors
void motorAOn()
{
digitalWrite(enableA, HIGH);
}
void motorBOn()
{
digitalWrite(enableB, HIGH);
}
//disable motors
void motorAOff()
{
digitalWrite(enableB, LOW);
}
void motorBOff()
{
digitalWrite(enableA, LOW);
}
//motor A controls
void motorAForward()
{
digitalWrite(pinA1, HIGH);
digitalWrite(pinA2, LOW);
}
void motorABackward()
{
digitalWrite(pinA1, LOW);
digitalWrite(pinA2, HIGH);
}
//motor B controls
void motorBForward()
{
digitalWrite(pinB1, HIGH);
digitalWrite(pinB2, LOW);
}
void motorBBackward()
{
digitalWrite(pinB1, LOW);
digitalWrite(pinB2, HIGH);
}
//coasting and braking
void motorACoast()
{
digitalWrite(pinA1, LOW);
digitalWrite(pinA2, LOW);
}
void motorABrake()
{
digitalWrite(pinA1, HIGH);
digitalWrite(pinA2, HIGH);
}
void motorBCoast()
{
digitalWrite(pinB1, LOW);
digitalWrite(pinB2, LOW);
}
void motorBBrake()
{
digitalWrite(pinB1, HIGH);
digitalWrite(pinB2, HIGH);
}
ภาพรวมการต่อ หุ่นยนต์เดินตามผนัง Wall Arduino
วีดีโอผลลัพธ์การทำงานของ โปรเจค หุ่นยนต์เดินตามผนัง Wall Arduino


ความคิดเห็น
แสดงความคิดเห็น